10 Brilliant Backyard Design Ideas on a Budget for 2025
- Dec 29, 2025
- 21 min read
A stunning backyard oasis often seems like an expensive, out-of-reach luxury. We picture professionally installed stone patios, elaborate water features, and lush, mature gardens, all with price tags to match. But what if you could achieve a beautiful, functional, and personalized outdoor space without draining your savings? This guide is dedicated to proving that incredible backyard transformations are possible on a strict budget. We are moving beyond generic advice to provide a comprehensive collection of actionable and affordable backyard design ideas on a budget that prioritize creativity over cash.
This is not just a list of vague suggestions. We have curated 10 high-impact projects that anyone can tackle. Each idea is broken down into practical steps, realistic cost estimates, and straightforward maintenance tips to ensure your investment of time and money pays off for years to come. From low-cost hardscaping using salvaged materials to creative container gardening and DIY seating areas, you'll find a solution that fits your style and your wallet.
Crucially, we'll show you how to eliminate the expensive guesswork that often comes with landscaping projects. Throughout this guide, we will discuss how you can use powerful AI Landscape Design tools, such as the DreamzAR app, to visualize these changes directly onto a photo of your own yard. This allows you to preview different materials, plant arrangements, and layouts before you even buy a bag of mulch. Stop dreaming and start planning; your perfect budget-friendly backyard is just a few simple projects away.
1. DIY Mulch and Ground Cover Landscaping
One of the most effective and affordable backyard design ideas on a budget is to replace expensive, high-maintenance turf grass with versatile mulch and ground covers. This strategy instantly creates a clean, intentional look, defining pathways, garden beds, and seating areas without the cost of sod or hardscaping. Mulch and ground covers suppress weeds, retain soil moisture to reduce water bills, and provide a polished foundation for any landscape style.
This foundational approach is incredibly versatile. You can create a serene Japanese-style garden using smooth river rock or pea gravel, design a modern minimalist yard with dark bark chip pathways, or cultivate a charming cottage look with rich, shredded hardwood mulch around perennial beds. The key is using these materials to build the structure of your design first.
Key Details & Implementation
Estimated Cost: $0.50 - $3 per square foot (depending on mulch type)
DIY Difficulty: Beginner
Materials Needed: Landscape fabric (optional but recommended), garden rake, shovel, wheelbarrow, edging material (metal, plastic, or stone).
Maintenance: Replenish organic mulch every 1-2 years as it decomposes. Rake stone or gravel periodically to keep it clean and level.
Actionable Tips for Success
Before you begin, it’s crucial to visualize how different materials will look in your space. This is a perfect opportunity for AI-driven landscape design.
Pro Tip: Visualize with AIUse an app like DreamzAR to upload a photo of your backyard. You can then digitally overlay different types of mulch, like red cedar, black bark, or river stones, to see which color and texture best complements your home's exterior and existing plants. This step prevents costly mistakes and ensures you love the final result.
Once you've chosen your materials, follow these steps:
Calculate Correctly: Measure the length and width of the area to get the square footage. A 2-inch layer of mulch typically requires one cubic yard for every 162 square feet.
Prepare the Area: Clear all grass, weeds, and debris from the space. For maximum weed control, lay down a layer of cardboard or permeable landscape fabric first.
Apply Evenly: Spread the mulch to a depth of 2-3 inches. This depth is optimal for suppressing weeds and retaining moisture without suffocating plant roots.
Create Crisp Edges: Use a spade to cut a clean edge between your mulched areas and any remaining lawn, or install affordable plastic or metal edging for a long-lasting, defined border.
2. Salvaged and Reclaimed Material Hardscaping
One of the most impactful backyard design ideas on a budget involves sourcing salvaged materials for hardscaping. Building patios, pathways, and garden walls with reclaimed brick, stone, or wood dramatically cuts costs, often by 50-70%, compared to buying new. This approach not only saves money but also infuses your backyard with unique character, history, and a commitment to sustainability that new materials can't replicate.

This strategy allows for incredible creativity. You can construct a charming patio from mismatched bricks salvaged from a local demolition, build rustic raised garden beds from reclaimed timber, or create a winding garden path using broken concrete pieces arranged in a mosaic pattern (a technique known as urbanite). The key is to let the unique qualities of the found materials guide your design.
Key Details & Implementation
Estimated Cost: $0 - $4 per square foot (depending on source and material)
DIY Difficulty: Intermediate
Materials Needed: Shovel, tamper, level, wheelbarrow, paver base, sand, safety gear (gloves, goggles).
Maintenance: Varies by material. Reclaimed wood may need sealing, while stone and brick require occasional sweeping and weed removal between joints.
Actionable Tips for Success
Finding the right reclaimed materials can be a treasure hunt, and visualizing how they'll look is the most challenging part. An AI design tool can bridge this gap before you commit to hauling heavy materials.
Pro Tip: Visualize with AIBefore you buy a pallet of used bricks, use an app like DreamzAR to see how they will look. Snap a photo of your yard and use the app’s hardscaping tools to digitally "install" a reclaimed brick patio or a salvaged stone pathway. This helps you confirm that the material's color, texture, and pattern fit your overall vision.
Once you're ready to start building, keep these tips in mind:
Source Smartly: Check online marketplaces like Facebook Marketplace and Craigslist for free or cheap materials. Also, contact local demolition companies and architectural salvage yards.
Inspect Thoroughly: Carefully examine all materials for major cracks, crumbling, or rot. Ensure bricks are solid (not hollow-cored) and that any wood is suitable for ground contact.
Plan for Prep: Salvaged materials often require cleaning. Budget time to scrub bricks with a wire brush or pressure wash old pavers before installation.
Embrace Imperfection: The beauty of reclaimed materials is their unique wear and tear. Design your project to highlight these imperfections rather than trying to make everything look brand new and uniform.
3. Container Gardening and Vertical Planting
When space or budget is tight, growing plants in pots, raised containers, and on vertical structures is one of the most clever backyard design ideas on a budget. This strategy maximizes your growing area without the cost and labor of digging new garden beds. It offers incredible flexibility, allowing you to easily rearrange your design, bring plants indoors for winter, or simply refresh your look season after season.
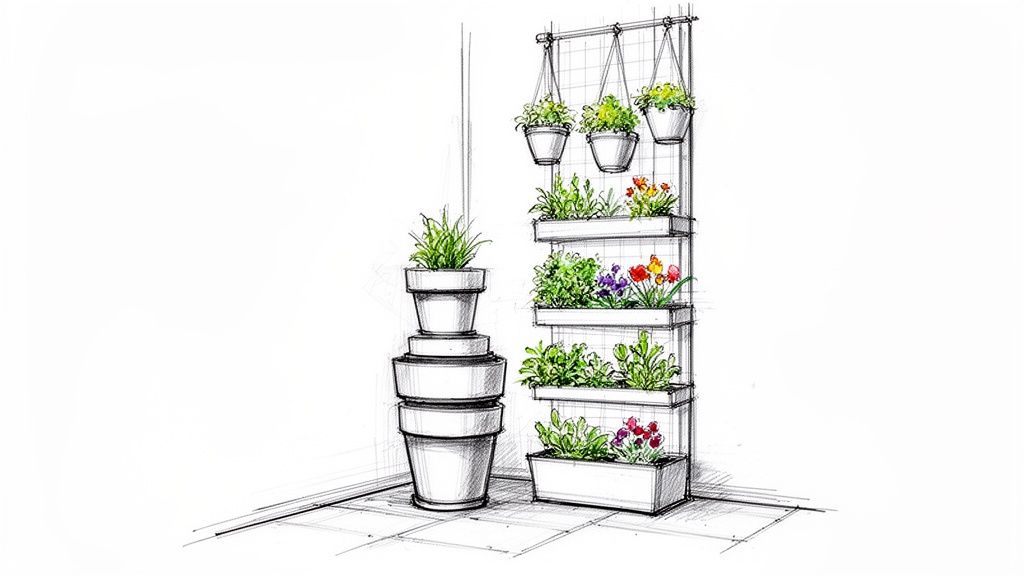
This approach is perfect for adding life to patios, balconies, and small yards. You can create a tiered herb garden near your outdoor kitchen, build a privacy screen with tall planters, or design a vibrant vertical flower wall using pocket planters. The key is to think upwards and use containers to add color, texture, and dimension exactly where you want it.
Key Details & Implementation
Estimated Cost: $5 - $50+ per container (highly variable based on material and size)
DIY Difficulty: Beginner
Materials Needed: Containers (pots, planters, repurposed items), potting mix, plants or seeds, small trowel, watering can.
Maintenance: Regular watering is crucial as containers dry out faster than in-ground beds. Apply a balanced liquid fertilizer every 2-4 weeks during the growing season.
Actionable Tips for Success
Visualizing how different pot sizes, colors, and arrangements will fit your space is essential before you start buying materials. This is where modern tools can save you time and money.
Pro Tip: Visualize with AIUse a landscape design app like DreamzAR to virtually place different containers in your backyard. Upload a photo of your patio or wall and experiment with arrangements of terracotta pots, modern rectangular planters, or hanging baskets to see what combination creates the best visual impact without cluttering the space.
Follow these tips for a thriving container garden:
Choose the Right Pot: Ensure every container has drainage holes to prevent root rot. Lightweight resin or plastic pots are easier to move than heavy ceramic or concrete ones.
Group Strategically: Place plants with similar water and sun requirements together. This simplifies your watering routine and helps all plants thrive.
Create Visual Interest: Vary the height, color, and texture of your containers. Elevate some pots on stands or stack them to create layers and draw the eye upward.
Repurpose Creatively: Save money by turning old buckets, watering cans, or wooden crates into unique, charming planters. Just be sure to drill drainage holes. For a deeper understanding of planning your layout, you can explore AI-driven garden layout optimization techniques for more insights.
4. Native Plant Landscaping
One of the most sustainable and intelligent backyard design ideas on a budget is to embrace native plants. This approach involves selecting plants that have evolved in your specific region, making them naturally adapted to the local climate, soil, and rainfall patterns. The result is a beautiful, resilient garden that thrives with minimal intervention, dramatically reducing costs associated with water, fertilizers, and pest control while creating a vital habitat for local wildlife like birds and pollinators.
This strategy works anywhere, from creating a vibrant wildflower meadow in a Midwest backyard to designing a drought-tolerant desert garden in the Southwest. By choosing plants that are already equipped to succeed, you spend less time and money fighting against nature and more time enjoying a landscape that feels authentic to its surroundings. This method builds a self-sufficient ecosystem right in your yard.
Key Details & Implementation
Estimated Cost: $5 - $25 per plant (save money by starting with smaller plants or seeds)
DIY Difficulty: Beginner to Intermediate
Materials Needed: Shovel, garden gloves, compost or soil amendment (if needed), mulch (wood chips or leaf litter).
Maintenance: Water regularly during the first year to establish roots. After that, most native plants require little to no supplemental watering. Prune as needed and remove weeds while plants fill in.
Actionable Tips for Success
Visualizing how these new plants will fit into your existing landscape is a critical first step. You can use AI Landscape Design to see how your plant choices will look by virtually placing them on a photo of your yard. This ensures you achieve a cohesive design rather than a random collection of plants.
Pro Tip: Visualize with AIBefore you buy, use the DreamzAR app to digitally place native plants into a photo of your yard. You can experiment with different species like Coneflowers, Black-Eyed Susans, or local grasses to see how their colors, textures, and mature sizes will look next to your patio or along a fence line. This helps you create a professional-looking design from the start. Learn more about using AI to select native plants.
Once you have a design in mind, follow these steps:
Start Small: Don't feel pressured to overhaul your entire yard at once. Begin with a small, manageable garden bed and select 3-5 hardy native species to learn with.
Consult Local Experts: Contact your local Native Plant Society or university extension office. They can provide lists of plants perfectly suited for your specific soil and light conditions.
Group by Needs: Arrange plants with similar water and sun requirements together. This "zoning" makes watering more efficient and helps ensure every plant thrives.
Mulch Heavily: Apply a thick, 2-3 inch layer of natural mulch like shredded leaves or bark after planting. This helps new plants retain moisture, suppresses weeds, and enriches the soil as it breaks down.
5. DIY Fire Pit and Seating Areas
A DIY fire pit is one of the most impactful backyard design ideas on a budget, creating a natural gathering spot for family and friends. It transforms an underused patch of grass into a functional and inviting social hub. Using simple materials like concrete blocks, gravel, or retaining wall stones, you can build a stunning fire pit and seating area for a fraction of the cost of professional installation, often for under $300.
This approach anchors your backyard design, providing a focal point for evening entertainment and relaxation. You can create a rustic feel with stacked fieldstone, a modern look with sleek concrete blocks, or a simple, flexible space with a portable metal fire bowl on a gravel pad. The surrounding seating area completes the "outdoor room" concept, making your yard more usable.
Key Details & Implementation
Estimated Cost: $100 - $400 (depending on materials and size)
DIY Difficulty: Beginner to Intermediate
Materials Needed: Fire-rated concrete blocks or stones, construction adhesive, shovel, level, tamper, gravel or sand for the base, tape measure.
Maintenance: Regularly clean out ash from the pit. Check stones or blocks annually for stability and re-secure with adhesive if needed.
Actionable Tips for Success
Visualizing the scale and placement of a fire pit is essential for safety and aesthetics. An AI design tool can help you perfect the layout before you start digging.
Pro Tip: Visualize with AIUse an app like DreamzAR to virtually place a fire pit in your yard. Upload a photo and experiment with different locations to ensure proper clearance from your house, trees, and fences. You can also test layouts for seating, like curved benches or scattered chairs, to see how the space will function.
Follow these steps for a safe and successful build:
Check Local Codes: Before you buy materials, contact your local fire department or municipality to learn about regulations regarding open flames, required clearances (often 10-25 feet from any structure), and permissible fire pit sizes.
Build a Stable Base: Dig a shallow circle about 6 inches deep. Fill it with a 2-3 inch layer of gravel or sand and tamp it down until it's perfectly level. This ensures proper drainage and a stable foundation for your blocks.
Dry Stack First: Lay your first course of blocks to ensure a perfect circle. Once you are satisfied with the shape, you can begin stacking the next layers, securing them with construction adhesive.
Design Your Seating: Arrange seating in a circular or semi-circular pattern to encourage conversation. When choosing furniture, consider durable outdoor furniture materials that can withstand the elements. Build simple benches from reclaimed wood or cinder blocks for a truly budget-friendly option.
6. Budget-Friendly Patio and Pathway Solutions
Creating a functional patio or defined pathway is a cornerstone of great backyard design, but traditional hardscaping can be prohibitively expensive. Budget-friendly patio and pathway solutions use affordable materials like concrete pavers, pea gravel, or even recycled asphalt to build durable, attractive outdoor living spaces without the high labor costs. This approach provides essential structure and function, transforming muddy patches into usable, stylish areas for seating, grilling, or walking.
This method empowers homeowners to create everything from a simple gravel seating area under a tree to a sophisticated paver patio perfect for entertaining. By combining materials, such as a core paver patio with surrounding mulch pathways, you can achieve a high-end look while keeping costs firmly in check. These materials are widely available and well-suited for DIY installation.
Key Details & Implementation
Estimated Cost: $2 - $8 per square foot (depending on materials)
DIY Difficulty: Intermediate
Materials Needed: Pavers or gravel, crushed stone base, landscape fabric, sand, tamper (rental), level, shovel, wheelbarrow, edging.
Maintenance: Sweep pavers and refill joint sand as needed. Rake gravel periodically and top up every few years. Pull any stray weeds that emerge.
Actionable Tips for Success
Visualizing how different patio shapes, paver patterns, and pathway materials will look against your home is a major challenge. This is where AI tools become invaluable for planning.
Pro Tip: Visualize with AIUse an app like DreamzAR to upload a photo of your backyard. You can test out different paver styles, from classic red brick to modern concrete slabs, and see how a gravel pathway connects to your lawn. This digital mock-up helps finalize your layout and material choices before you start digging. To explore this topic further, discover how to use generative AI for patio design.
Once your design is set, ensure a professional-quality installation with these steps:
Build a Solid Base: The most critical step is preparing the foundation. Excavate the area and lay a 2-4 inch layer of compacted crushed stone, followed by a layer of sand. This prevents sinking and shifting over time.
Ensure Proper Drainage: When building your base, create a very slight slope (about 1/4 inch per foot) away from your home's foundation to direct rainwater away.
Stagger the Pattern: When laying pavers, stagger the joints like a brick wall. This creates a stronger, more stable surface that is also more visually appealing.
Contain Your Materials: Install wood, metal, or plastic edging around your patio or pathway. This creates a clean, defined border and prevents gravel or pavers from migrating into your lawn or garden beds.
7. Low-Maintenance No-Grass Alternatives
Replacing a demanding turf lawn is one of the most impactful backyard design ideas on a budget, saving you money on water, fertilizer, and mowing equipment. Low-maintenance alternatives like clover, native groundcovers, or artificial turf create a lush, green aesthetic without the constant upkeep. This strategy is perfect for homeowners seeking sustainable, eco-friendly yards that look great year-round while reducing long-term costs.
This approach offers diverse styles. A white clover lawn provides a soft, bee-friendly surface that stays green even in dry conditions. A rock garden featuring sedums and other low-growing perennials offers a textured, xeriscaped look. For small urban spaces, a patch of high-quality artificial turf can provide a perfect, maintenance-free play area.
Key Details & Implementation
Estimated Cost: $0.20 - $15 per square foot (Clover is cheapest; artificial turf is most expensive)
DIY Difficulty: Beginner to Intermediate
Materials Needed: Seed spreader (for clover), landscape fabric, shovel, sand/gravel base (for turf), selected plants or turf.
Maintenance: Varies by type. Clover may need occasional mowing; groundcovers may need seasonal trimming. Artificial turf requires rinsing and brushing.
Actionable Tips for Success
Visualizing a yard without a traditional lawn can be difficult. AI tools can bridge this gap, helping you see the potential of different textures and materials before committing.
Pro Tip: Visualize with AIUse an app like DreamzAR to upload a picture of your yard and digitally replace your grass. You can test the look of a full clover lawn, compare it to a creeping thyme groundcover, or see how a section of artificial turf would fit next to your patio. This ensures your no-grass choice aligns with your home's aesthetic.
After visualizing your new landscape, follow these steps:
Choose the Right Alternative: Select a groundcover native to your region for the best results, as it will be adapted to your climate and soil.
Prepare the Ground: Properly remove the existing turf and amend the soil if necessary. For artificial turf, installing a proper drainage base of compacted sand or gravel is essential for longevity.
Plant or Install Correctly: Overseed existing grass with clover for a gradual transition, or plant groundcover plugs according to spacing recommendations. For artificial turf, ensure all seams are secured and invisible.
Combine for Visual Interest: Mix groundcovers with mulched beds or gravel pathways to create definition and avoid a monotonous look. This approach is central to xeriscaping. Learn more about planning a low-water yard with our guide on AI-assisted xeriscape planning.
8. Budget-Friendly Shade Structures and Pergolas
Adding a shade structure is a game-changing backyard design idea on a budget that dramatically extends the usability of your outdoor space. Instead of paying thousands for a professional installation, you can build an attractive and functional pergola or shade sail structure yourself. This addition provides much-needed relief from the sun, creates a defined zone for dining or lounging, and serves as an elegant architectural focal point.
From a classic wooden pergola adorned with climbing vines to a modern, minimalist shade sail, the options are vast and affordable. These structures define and anchor outdoor "rooms," making your backyard feel more intentional and inviting. They not only offer comfort but also add significant vertical interest and value to your landscape.
Key Details & Implementation
Estimated Cost: $300 - $800
DIY Difficulty: Intermediate
Materials Needed: Pressure-treated lumber or cedar posts/beams, concrete mix, post-hole digger, level, drill, lag bolts, shade sail fabric and hardware kit.
Maintenance: Re-stain or seal wood every 2-3 years. Clean shade sails annually with mild soap and water.
Actionable Tips for Success
Visualizing how a large structure will impact your yard's light and space is difficult. AI design tools remove the guesswork, ensuring your investment enhances your backyard perfectly.
Pro Tip: Visualize with AIBefore buying materials, use the DreamzAR app to virtually place different pergola or shade sail designs in your yard. Upload a photo and experiment with styles, from a traditional 10x10 wood pergola to triangular sail shades. This helps you confirm the size, placement, and style that best suits your space. You can learn more about automated pergola design using AI.
Follow these steps for a successful build:
Choose the Right Materials: When building a wooden structure, exploring different cost-effective wood options like pressure-treated pine or cedar is key. Ensure any lumber used for posts is rated for ground contact.
Secure the Foundation: For any post-based structure, digging and setting the posts in concrete footings is non-negotiable. This ensures the structure is stable and safe against wind and weather.
Plan for the Sun: Observe your backyard to determine where the sun is during the hottest parts of the day. Position your structure to provide maximum shade when you'll use the space most.
Incorporate Living Shade: Plant fast-growing, non-invasive climbing vines like clematis, hops, or trumpet vine at the base of your pergola. They will quickly grow to create a lush, natural, and beautiful green canopy.
9. Creative Plant Propagation and Seed Starting
One of the most powerful and rewarding backyard design ideas on a budget involves growing your own plants from seeds, cuttings, and divisions. This approach drastically cuts costs associated with purchasing mature plants from a nursery, allowing you to fill your garden beds with lush greenery for a fraction of the price. A modest initial investment in seeds and supplies can yield hundreds of dollars worth of plants, transforming a sparse yard into a vibrant oasis.
This strategy empowers you to create abundant, personalized gardens. Imagine starting an entire field of zinnias or cosmos from a few packets of seeds, multiplying your favorite hostas to create a dense border, or rooting basil cuttings in a jar of water on your windowsill. Propagation turns one plant into many, making it the ultimate budget-friendly technique for achieving a full, established landscape.
Key Details & Implementation
Estimated Cost: $25 - $75 for initial supplies (soil, pots, seeds).
DIY Difficulty: Beginner to Intermediate
Materials Needed: Seed starting mix, small pots or trays, seeds or parent plants, rooting hormone (optional), grow lights or a sunny window.
Maintenance: Regular watering, thinning seedlings, and gradually acclimating young plants to outdoor conditions (hardening off).
Actionable Tips for Success
Visualizing the long-term impact of your propagation efforts is key. You need to know where all your new, free plants will go to create a cohesive design.
Pro Tip: Visualize with AIBefore you start propagating, use a landscape design app like DreamzAR to plan your garden beds. Upload a photo of your empty yard and digitally place mature versions of the plants you intend to grow. This allows you to visualize the final composition, test different arrangements of hostas or daylilies, and ensure your propagation plan supports a beautiful, intentional design.
Follow these steps for a successful start:
Start with Easy Plants: Begin with forgiving species like zinnias, cosmos, basil, mint, and sedums. These are quick to germinate or root, providing a rewarding experience for beginners.
Divide Perennials: In spring or fall, dig up clumping perennials like hostas, daylilies, and ornamental grasses. Gently pull or cut the root ball into smaller sections and replant them to instantly multiply your stock.
Take Cuttings: Snip a 4-6 inch stem from herbs like rosemary or lavender. Remove the lower leaves and place the stem in water or moist potting soil. Roots will form in a few weeks.
Harvest Your Own Seeds: At the end of the growing season, let a few of your favorite annual flowers go to seed. Collect the dried seed heads, store them in a cool, dry place, and plant them next spring for zero cost.
10. Repurposed and Upcycled Landscape Decor
One of the most creative and impactful backyard design ideas on a budget involves transforming everyday items and reclaimed materials into unique landscape features. Upcycling decor adds personality and character that you can't buy in a store, turning potential junk into charming, functional art. This approach is perfect for those who want a truly one-of-a-kind space without a significant financial investment.
This sustainable strategy allows for endless creativity. You can build a vertical garden from an old wooden pallet, use a vintage ladder as a tiered plant stand, or even turn a reclaimed window frame into a whimsical trellis for climbing vines. The key is to see the potential in discarded items and integrate them thoughtfully into your garden's design.
Key Details & Implementation
Estimated Cost: $0 - $75 (cost of paint, sealant, or hardware)
DIY Difficulty: Beginner to Intermediate
Materials Needed: Found objects (pallets, old tires, ladders, window frames), sandpaper, exterior paint or sealant, drill, screws, basic hand tools.
Maintenance: Re-seal or repaint wooden items every 2-3 years to protect them from the elements. Ensure items are stable and securely placed.
Actionable Tips for Success
Visualizing how eclectic pieces will fit into a cohesive design can be challenging. An AI tool can help you arrange these unique elements before you commit to placing them.
Pro Tip: Visualize with AIUse an app like DreamzAR to test your upcycled concepts. Take a photo of your garden bed or patio, then use the app’s object library or upload images of your finds to see how a brightly painted tire planter or a rustic pallet garden will look. This ensures your creative additions enhance your space rather than clutter it.
To make your upcycled decor look intentional and stylish, follow these steps:
Source Strategically: Check Facebook Marketplace, Craigslist, and local estate sales for free or low-cost materials. Don't become a collector; only acquire items with a specific purpose in mind.
Create Cohesion: Unify different upcycled pieces by painting them in a consistent color palette that complements your home and existing landscape. A fresh coat of paint makes anything look deliberate.
Weatherproof Everything: Protect your creations from rot, rust, and sun damage. Apply a quality exterior-grade sealant to all wood and metal surfaces to ensure they last for years.
Group for Impact: Place upcycled items in small, intentional clusters to create a focal point. A single decorated tire might look lost, but a group of three at varying heights creates a dynamic, professional-looking planter arrangement.
Budget Backyard Design: 10-Item Comparison
Approach | 🔄 Implementation Complexity | ⚡ Resource & Speed Efficiency | 📊 Expected Outcomes & ⭐ Quality | Ideal Use Cases | 💡 Key Tip |
|---|---|---|---|---|---|
DIY Mulch and Ground Cover Landscaping | Low — weekend DIY, minimal skills | Very low material cost ($20–50/yd³); moderate physical labor | Clean beds, strong weed suppression, 50%+ water savings; ⭐⭐⭐ | Budget beds, pathways, quick refreshes | Layer 2–3" mulch; refresh every 1–2 years |
Salvaged & Reclaimed Material Hardscaping | Medium — more planning and prep for irregular pieces | High cost savings (50–70%) but time-consuming sourcing | Unique, weathered aesthetic; durable if selected well; ⭐⭐⭐⭐ | Rustic patios, vintage character installations | Inspect integrity; plan design around available pieces |
Container Gardening & Vertical Planting | Low — modular, easy to rearrange | Low upfront cost; water use reduced but frequent watering for pots | Flexible, high visual impact, ideal for small spaces; ⭐⭐⭐ | Small yards, renters, patios, seasonal displays | Group by water needs; use lightweight pots and drip irrigation |
Native Plant Landscaping | Low–Medium — requires plant knowledge and planning | Low ongoing resource needs; 30–50% less irrigation long-term | Sustainable, low-maintenance, supports pollinators; ⭐⭐⭐⭐ | Low-maintenance, ecological gardens, drought-prone areas | Start with 3–5 species; mulch first year to establish |
DIY Fire Pit & Seating Areas | Low–Medium — simple builds but check safety/regulations | Very affordable DIY ($100–300); quick weekend project | High social/usable value; focal point for evenings; ⭐⭐⭐ | Gatherings, casual entertaining, backyard focal zones | Check local codes/HOA; keep 10+ ft clearance from structures |
Budget-Friendly Patio & Pathway Solutions | Low–Medium — needs base prep for longevity | Affordable materials ($1–10/sq ft); equipment may speed install | Durable, structured outdoor areas; permeable options improve drainage; ⭐⭐⭐ | Low-cost patios, walkways, mixed-material layouts | Prep 2–4" crushed stone base; install edging for containment |
Low-Maintenance No‑Grass Alternatives | Medium — conversion varies (turf vs plantings) | Big water and mowing savings; initial costs vary (turf higher) | Long-term low upkeep, 50–80% water reduction; ⭐⭐⭐⭐ | Water-wise yards, HOA-limited mowing, small lawns | Test clover partial replacement; ensure drainage for turf |
Budget-Friendly Shade Structures & Pergolas | Medium — carpentry skills recommended; possible permits | Moderate cost DIY ($300–800); staged builds possible | Increased comfort and usability; defined outdoor rooms; ⭐⭐⭐ | Patio shading, dining areas, progressive upgrades | Use pressure-treated posts; plan for sun angle and wind loads |
Creative Plant Propagation & Seed Starting | Low–Medium — skill and patience required | Very low cost per plant (80–90% savings); time-intensive | Large plant supply over time; educational and adaptive; ⭐⭐⭐ | Building plant stock, heirloom varieties, community sharing | Start easy species; use shop lights; join seed swaps |
Repurposed & Upcycled Landscape Decor | Low–Medium — creative skill; variable prep | Minimal material cost ($0–200); time to source/repair | Unique, personalized character; durability varies; ⭐⭐⭐ | Eclectic, bohemian, low-budget focal pieces | Weatherproof and group pieces intentionally to avoid clutter |
Bringing Your Budget-Friendly Vision to Life with AI
Creating an outdoor sanctuary doesn't hinge on a colossal budget; it thrives on creativity, resourcefulness, and intelligent planning. Throughout this guide, we've explored a multitude of backyard design ideas on a budget, demonstrating that impactful, beautiful transformations are well within reach. The power to craft your ideal space lies not in expensive materials but in strategic choices and a willingness to embrace DIY solutions.
You now have a robust toolkit of cost-effective strategies. From the simple, satisfying work of laying DIY mulch paths and cultivating native plants to the more ambitious projects like building a fire pit from salvaged stone or constructing a shade pergola, each idea represents a pathway to a more enjoyable and functional backyard. The common thread connecting them all is the principle of maximizing value while minimizing expense.
The Core Principles of Budget-Wise Backyard Design
As you move from inspiration to implementation, remember these crucial takeaways that underpin every successful budget-friendly project:
Resourcefulness is Your Greatest Asset: The most beautiful backyards often feature reclaimed materials, propagated plants, and upcycled decor. Before buying new, always consider what you can salvage, repurpose, or create yourself. This approach not only saves money but also adds a unique, personal character to your space that store-bought items can't replicate.
Planning Prevents Costly Mistakes: The most significant budget-killer is rework. Rushing into a project without a clear plan can lead to purchasing the wrong materials, miscalculating quantities, or realizing a design just doesn’t work in your space. A few hours of planning can save you hundreds of dollars and immense frustration.
Sweat Equity Builds Real Value: Many of the ideas we've covered, like creating a gravel patio or starting plants from seeds, trade a higher price tag for your time and effort. Embracing the DIY process is fundamental to achieving a high-end look on a low-end budget.
From Idea to Reality: The Power of Visualization
The single most powerful tool in your planning arsenal is visualization. The fear of the unknown often leads to indecision or, worse, a project that doesn't meet expectations. How will that pea gravel pathway look next to your existing deck? Does a vertical garden truly fit the scale of your small patio? Will a DIY pergola provide enough shade where you need it most? Answering these questions used to be a matter of guesswork and risky prototypes.
Key Insight: Confident execution begins with clear visualization. Seeing your ideas in the context of your actual yard eliminates uncertainty and ensures every dollar spent contributes directly to your desired outcome.
This is where modern technology becomes an essential partner in your budget-friendly design journey. AI landscape design tools empower you to bridge the gap between imagination and reality. By simply uploading a photograph of your current backyard, you can instantly test and refine any of the concepts from this article. You can virtually lay down different types of ground cover, position a container garden, see how a salvaged-brick fire pit anchors a seating area, or experiment with native plant arrangements. This process allows you to make informed decisions with confidence, ensuring your backyard design ideas on a budget are executed flawlessly the first time. It transforms planning from an abstract exercise into a concrete, visual roadmap, safeguarding your investment of both time and money.
By combining the practical, cost-saving strategies we've discussed with the predictive power of AI visualization, you are perfectly equipped to create an outdoor living space that is beautiful, functional, and refreshingly affordable. Your dream backyard is not a distant fantasy; it’s a series of smart, creative, and well-planned steps away from becoming your reality.
Ready to stop guessing and start designing? DreamzAR AI Landscape Design helps you visualize these budget-friendly ideas in your own yard before you lift a single shovel. Download the app today and bring your perfect, affordable backyard design to life with confidence. DreamzAR AI Landscape Design